Important: if you are searching for a round trip, the filters must be applied separately for each leg of the journey.

Orientações gerais
A VOLL oferece suporte completo desde o primeiro acesso, com orientações para cadastro e gerenciamento de solicitações.
Passagens aéreas
Compre passagens aéreas para você ou terceiros dentro das políticas da empresa, configure bagagem e assento de acordo com sua necessidades.
Hospedagem
Reserve sua hospedagem no marketplace da VOLL usando o acordo corporativo da sua empresa, tenha acesso à avaliações do google e a localização exata do seu hotel.
Passagens rodoviárias
Compre suas passagens de ônibus pelo app VOLL. Compare preços, horários e opções de empresas de ônibus para fazer a melhor escolha.
Locação de veículo
Reserve veículos para locação de forma prática e rápida, com tarifas competitivas e flexibilidade nas reservas.
Mobilidade urbana
Mobilidade urbana com todos os serviços de transporte corporativo: carros por aplicativo, táxi e transporte público.
Reembolso KM
Solicite o reembolso de quilômetros rodados de maneira prática. A VOLL permite que você registre os trajetos percorridos, facilitando todo o processo.
VOLL Wallet
Sua carteira virtual para pagamentos corporativos integrados (cartão, pix e reembolso) tudo em um único app.
General guidelines
-
VOLL supports you from the very beginning, helping you set up the app, register your details, and understand travel policies. You can easily manage your requests, make changes, or cancel them—all conveniently and seamlessly.
-
The first step is to download the VOLL app and enable your access.
Let's start by downloading the app on your mobile device:
After downloading the app, open it and on the home screen tap “Next” to continue, or in the top corner of the screen tap “Skip”.
On the next screen, check the box to accept the privacy policy terms and tap “Start now”.

The app will ask you to turn on your location and notifications.

On the login screen, enter your corporate email or phone number (if already registered on the platform).
You can select the “Remember me” option, this way your email will be saved after the first successful access.
When you tap “Continue,” a browser screen will open for you to log in with your corporate account if your company has integration with your internal platform, or you will create a password and enable your biometrics.That's it! Your VOLL app access should now be enabled and ready to use.
If your question has not yet been resolved, access our customer service channels via WhatsApp, chat, phone, or email and ask one of our consultants your questions. -
A corporate travel policy is a document that sets out the standards you must follow when traveling for work.
The role of the corporate travel policy is to guide you regarding the booking, purchasing, and use standards for travel and mobility services required by your company.
It contains information such as:- who to contact to request the trip;
- what platforms and systems are available for purchasing a trip;
- what is the spending limit;
what are the rules that must be followed; - what contact methods are available for support before and during the trip;
- what are the recommendations and good practices encouraged by the company during a trip;
- what post-trip routines you need to follow, among others.
-
With the VOLL app, each company can determine its travel policy according to its own needs and in a personalized way.
Thus, when searching for hotels, flights, taxis, car rentals, etc., each option available to the employee has a visual signal: either green or red, depending on adherence to the company's travel policy.
The indexes can reflect rules regarding price, advance notice, or number of days. If the indicator appears green , it means the result is within the company's travel policy.
If it appears in red , it means that option does not comply with the registered policy.
To make a purchase or reservation outside of company policy, you will need to fill out a justification, which will be sent directly to your direct manager.
-
To view vouchers on VOLL, you first need to click on “Order” in the bottom bar of the app or in the sidebar on the web .
In this tab you can check all your requests and you can use filters, such as “Category”, where you can check all the products used and filter which one you want, such as airfare and hotel.
You can use it to check the status and details of your trip, just check it using this indicated path.
About the statuses:
- Requested: Indicates that the order was placed, but there is no online availability, or that there was some intermittent issue with the supplier. This requires manual intervention, in which the VOLL team contacts the supplier directly.
- Issuing: This means the request has been approved and is in the issuance process. This process can occur online or, due to availability issues, may require assistance from our customer service team.
- Issued: The voucher or reservation has already been issued and approved, and the corresponding charge has already been made.
- Canceled: This status indicates that the order was canceled before reaching the "Issued" status, either by customer request, service unavailability, or other reason. There will be no charge in this scenario.
- In approval: The request is awaiting approval from the manager responsible for the user or cost center.
- Expired: The request or reservation was not approved within the established timeframe and has lost its validity. It will no longer be usable; a new request will be required.
- Rejected : The request was rejected by the workflow approver, possibly because it did not meet the necessary policy requirements. You can see the reason given by the approver in the "Approvals" tab, which will show the information they provided when rejecting the request. The process will not progress, and no charge or reservation will be issued.

Important: Vouchers whose cancellation is requested after issuance will still keep the status “Emitted”, but they will receive a “Not used” tag, which can be viewed when opening the voucher in the platform.
Keeping track of your voucher status is essential to ensure everything is in order for your trip. -
To request the cancellation of a voucher that is already “Issued,” go to “Orders” on the web or the bottom menu of the app, click on the voucher you want to cancel, scroll down, and click “Request Cancellation,” as shown in the image below:

After clicking this option, you will be taken to a screen that says: ‘Why do you want to cancel this reservation?
Select the option that explains the reason for the cancellation, check the box that says ‘I acknowledge that this is…,’ and then click ‘Request Cancellation.
After that, a “NOT USED” tag will be added to the voucher, indicating that the cancellation has been processed, but the voucher will remain with the status “issued,” okay?
If your voucher is not yet in the “Issued” status and is in any of the following statuses: “Requested,” “Pending Approval,” or “Being Issued,” you can also proceed with the cancellation request.
Go to “Request” on the web or in the bottom menu of the app, click on the voucher you want to cancel, scroll down, and click “Cancel,” as shown in the image below:
After clicking this option, you will be directed to a screen that says: “Do you really want to cancel this voucher?”

Select the option that explains the reason for the cancellation, and then click “Yes.”
After that, the status of your voucher will change to “Cancelled.”
-
To request a change to your voucher’s reservation date, go to “Requests” on the web or in the bottom menu of the app, click on the voucher, scroll down, and click “Change reservation,” as shown in the image below:

After clicking this option, you will be directed to a screen that says: “Why do you want to change this reservation?
Select the option that explains the reason for the change, check the box that says “I acknowledge that this is…,” and then click “Request change.

After confirming, you will be taken to a screen for the product whose reservation you requested to change (the example below is for a flight), and at the top, you will see a blue banner that says: “You are changing the trip (voucher and its details).

Now, just proceed with the trip change.
Remember: you can only change the date and time; the supplier must remain the same to continue with the alteration, understood?
If you are changing your flight, it must be with the same airline as before; if you are changing accommodation, it must be at the same hotel as before.
If you need to change the supplier, cancel the voucher and create a new request. -
To update your bank details, follow the steps below.
Via app: Tap on the top-right corner of the screen, where your name initials are displayed.
Via web: Click on the top-left corner of the screen, where your name initials are displayed.
Then, select the “My Profile” option.
Click on the “Bank Details” tab and then on “Add Account.”

Next, fill in your information and click the “Save Details” button.

Air tickets
-
Book domestic and international flights easily through the VOLL app. Compare fares, schedules, and airlines to ensure the best choice. The system allows you to follow your company’s travel policies, with clear visibility of approved and out-of-policy flights, providing greater control and security in travel management.
-
On the VOLL app or web platform, to search for air tickets, simply click on “Air tickets” on the home page.
When selecting the “Air tickets” option, either in the app or on the web, a screen will open for you to fill in the following information:
- Origin
- Destination
- Departure date
- Return date (if applicable)
- Traveler(s)
In both the “Origin” and “Destination” fields, you can search using the airport code or the city name.
You can choose between “Round trip,” “One way,” “Multi-city,” or “Combined.” To do this, select the desired option in the top menu.
You can also select the travel class you prefer: “Economy,” “Premium Economy,” “Business,” or “First Class.”
Keep in mind that not all class options will be available, as this depends on the policy assigned to the selected traveler.
-
If the user is a secretary or assistant, it’s possible to purchase tickets for up to 5 colleagues.
Simply click on the “Travelers” field and:
- Select the number of passengers.
- Enter each traveler’s full name.
- Choose which policy will be applied to the search (in case of multiple passengers).
To remove or replace someone, adjust the quantity using the “+” or “–” buttons.

-
Filters can be applied right after the search to refine the results:
- Within policy
- With or without stops
- Time of day (early morning, morning, afternoon, evening)
- Flight duration
- Price
- Airline
- Flight number

To access all filters, click “All Filters” — they will appear on the side of the screen.
After setting them up, click “Apply Filters.”
-
When you click on the flight card, a side panel opens with more information:
-
Airport name and code
-
Stopovers (no aircraft change)
-
Connections (with aircraft change)

-
-
Once all fields are filled in, the Confirm Reservation button will be activated.
When you click it, the booking is recorded in the system.
If the user cancels, the system will return to the outbound flights, keeping the previous filters applied.
Accommodation
-
VOLL offers access to over 300,000 hotel options worldwide. Find and book accommodations with details such as room types, available services, cancellation policies, Google reviews, and more.
All of this can be managed quickly and easily directly through the app, giving you more flexibility to choose the ideal accommodation. -
On the VOLL app home screen, or on the web platform, click on the “Hotel” option.
A search screen will appear with the following options:
Search by hotel name or point of interest
Check-in and check-out dates
Number of rooms and guests

You can perform the search in two ways:
**By entering the desired location**
For example: the hotel’s address, the place you want to visit, or a neighborhood.
**By entering a reference point**
For example: the name of beaches, squares, museums, or other public spaces.
Let’s start our search by entering a location, such as an avenue. Click on the search bar, and a pop-up will appear, as shown in the image:
Next, fill in the check-in and check-out dates. When you click on the “Check-in” or “Check-out” field, a calendar window will appear.
Select a start and end date on the calendar. The date range should appear as illustrated below.
After selecting the dates, click “Save” at the top of the window.
After saving, you need to check the guest’s name and the room.
Now it’s time to choose the type of accommodation!
Click on the “Rooms” bar where your name appears.A new window will open. In this window, you can choose the room options under the “Accommodation Types” category:
* Single
* Double
* Triple
Also, enter the number of rooms you want to reserve. Next, it’s time to fill in the names of the guests for each selected room.
By default, the app will fill in the account user’s name, but this can be changed.
-
To proceed with changing the guest, follow these steps:
1. Click on the name displayed on the screen.
2. A new screen will load. As you start typing, a list of registered users matching your search will appear.
3. In the blank field, type the name of the guest for whom you want to make the reservation.
Select the desired guest’s name. After clicking on the name, it will be loaded on the previous screen.
If you have selected two or more rooms, you will need to choose a primary guest for each room.
For guests sharing a room (double or triple), accompanying guests are not entered on the initial screen—they are added after selecting the hotel, and the accompanying guest must be registered on the platform.
Additionally, you will need to select which guest the company’s travel policy will apply to. This determines who will be responsible for the request if it falls outside the registered parameters. By selecting the guest, you indicate which travel policy will be applied.
For example, if there are two travelers with different positions, they may have policies with different value limits or advance booking requirements. By indicating which traveler’s policy will be applied, it applies to both, even if their individual rules differ. This way, both may be within or outside the policy, depending on whether the request complies with the selected traveler’s policy.
Once all fields are filled, click “Apply.”
-
On the search results screen, click “Search.” A list of accommodation options will appear.
Each hotel option will show:
* Whether it is within or outside the company policy
* Google review rating
* If there is a negotiated rate
* Hotel address (which can be copied)
* City where the hotel is located
* Google Maps route showing the way from the searched point to the selected hotel
* Hotel star rating
* Nightly rate
* Total accommodation cost, based on the number of nights
A great feature available in the VOLL app is the “View on map” option, allowing you to check if the hotel’s location is ideal for your business trip.
You can click the map icon and be automatically redirected to Google Maps.
After selecting a hotel, you can review the room details, such as whether breakfast is included, free cancellation and its deadline, as well as information about the bed type.
You’ll also be able to see available rates from:
* Online hotel search engines, such as Booking, Bedsonline, Expedia, etc.
* Corporate agreements
* VOLL agreements
You can view details of the amenities available at the hotel and check Google reviews from previous guests, as well as the hotel’s location on the map.
Choose one of the options and click the “Book” button. -
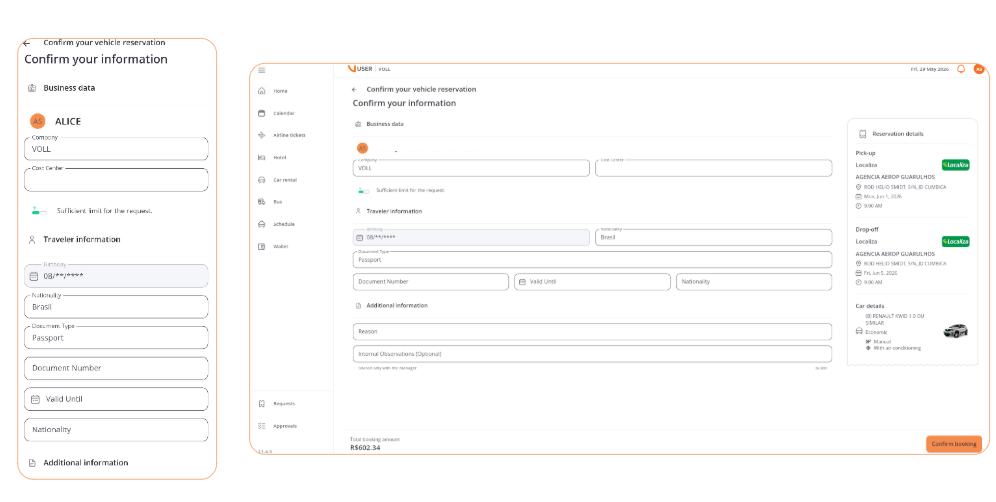
Right after clicking “Book,” the confirmation screen will display:
* **Corporate details:** traveler’s name, company, and cost center
* **Additional information:** reason and internal notes
* **Total per room**
* **Reservation details**
But don’t worry! The booking isn’t confirmed yet. First, we need to add the traveler’s information.
Once all fields are filled, you can confirm your reservation by clicking the orange button.
By clicking “Confirm booking,” you will be directed to a confirmation screen and receive an email with the request details in your inbox.
All set! Your accommodation request has been sent to your approver.
Any updates regarding this request will be notified through the app and via email.
To check the approval status, open the app on the home screen and click “Request” if you’re using the app or the web platform.
On this screen, you’ll be able to see all your trips that are pending approval or have already been approved. -
If no suitable hotel option is found after entering your search information, don’t worry! Our team can help you.
Scroll to the bottom of the screen and locate the following box:
Click the highlighted option to contact VOLL’s specialized team.
On the next screen, you’ll find two fields:
* **“Preferred hotel?”** – our platform will search online for this hotel, even if it’s not available at the time of your request.
* **“I declare that I couldn’t find…”** – use this if the hotel cannot be found online.
After filling in one of these fields, click “Continue.”
On the next page, under **“Request help”**, provide all possible details about the accommodation you want:
* Hotel name (if you haven’t already searched by name)
* Full address (if there are multiple hotels with the same name)
* Reason for the concierge request
The fields for traveler, number of rooms, accommodation type, and check-in/check-out dates are filled automatically.
Once the reservation request details are complete, click “Book.” You will be directed to the data confirmation screen to fill in the traveler’s information.
After entering the information, click “Save” in the app or “Confirm booking” on the web.
Bus Tickets
-
With VOLL, book bus tickets for various destinations. Choose from different companies and schedules, ensuring flexibility and savings on your land travel. All bookings are made directly through the platform, integrated with the expense management system.
-
Confira este passo no VOLLFlix
On VOLL, to search for bus tickets, go to the home screen and click “Bus.”
When you select “Bus,” both on the app and web, a screen will open to fill in the following information:
-
Origin
-
Destination
-
Departure date
-
Return date (if applicable)
-
Passenger(s)
In both the “Origin” and “Destination” fields, you can search by bus terminal or city.
After entering the origin and destination, you can choose the dates, either one-way or round-trip, and then click “Search.”

All available online travel options for the selected date will be displayed, and you can use the filters for “Travel period” and “Price.”

You can choose the time period for your travel from:
-
Morning (06:01 AM – 12:00 PM)
-
Afternoon (12:01 PM – 06:00 PM)
-
Evening (06:01 PM – 12:00 AM)
-
Early morning (12:01 AM – 06:00 AM)
You can also set the minimum and maximum price you are willing to pay.

Veja o passo a passo caso não encontre passagem de ônibus no VOLLFlix
-
-
Now it’s time to choose the best round-trip option (optional). You can check all the available options by scrolling through the screen, and you can also use the filters by price and travel time.

After choosing the company and departure time you want, you’ll need to select your bus seat. Just click on the seat you prefer and then click “Continue.”
After that, you’ll be automatically directed to the checkout page.
-
On the traveler information screen, you’ll need to provide the following details for each passenger:
Date of birth*
CPF (Brazilian tax ID)*
RG (ID document)*
Company*
Cost center (where the travel budget will be charged)*
Reason*
Notes
Fields marked with an asterisk (*) are mandatory.
The travel reasons are pre-defined by your company, so you’ll need to choose one of the options from the drop-down list.
On the other hand, the notes field is free text and optional, in case you’d like to provide any additional information to your approver.
Once you’ve filled in the mandatory fields, the option “Confirm booking” will appear.
If you’d like to cancel or edit the information, just click the arrow next to “Booking summary” in the app, or “We’re almost there” on the web.
You’ll then be redirected to the results page of your previous search.
-
After confirming your booking, your request will be sent to your manager for approval.
Even while it’s still pending, a voucher will already be generated, but we cannot guarantee the fare or the selected travel date.
Once your manager approves the travel request, your ticket will be issued, and the e-ticket details or reservation code will be sent to your email.
After the ticket is issued, your booking status will be updated to “emited.”

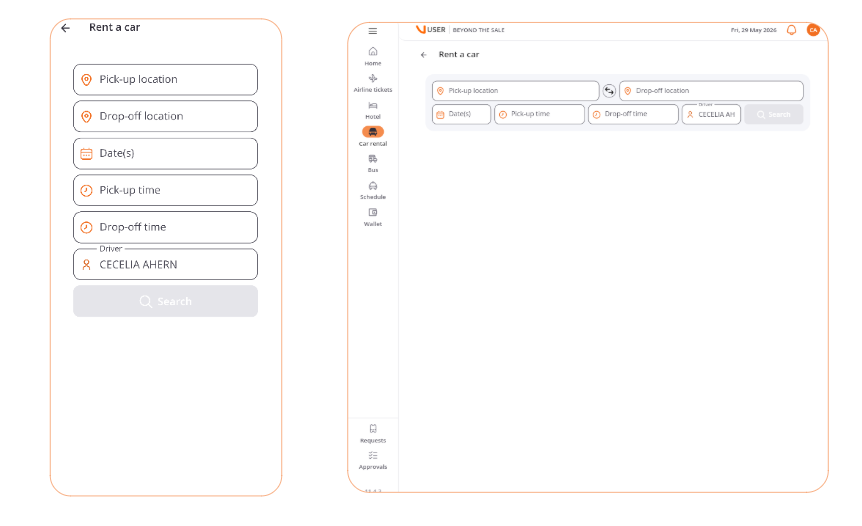
Vehicle Rental
-
The VOLL platform makes vehicle rental easy, offering a wide range of options, from economy cars to luxury vehicles. With competitive rates and flexible booking and cancellation conditions, users can manage all their rentals in a centralized and efficient way.
-
To rent a car, there are two options: via the app or the web.
In both cases, on the home screen, click “Car Rental.”

Fill in the requested information:
-
Pickup location
-
Drop-off location
-
Pickup date and time
-
Drop-off date and time
-
Driver

Then, click “Search” and choose one of the agencies.

If you entered a drop-off city different from the pickup city, select the vehicle return agency. And, choose the vehicle group you want to rent.
Finally, confirm your booking by filling in the traveler’s details:
-
Company
-
Cost center
-
Reason for the trip
-
Internal notes (optional)

Click “Confirm booking,” and you’re done! A voucher preview will be displayed on the screen with a summary of your reservation.
-
-
To rent a car with a driver, there are two options: via the app or the web.
In both cases, on the home screen, click “Car Rental.”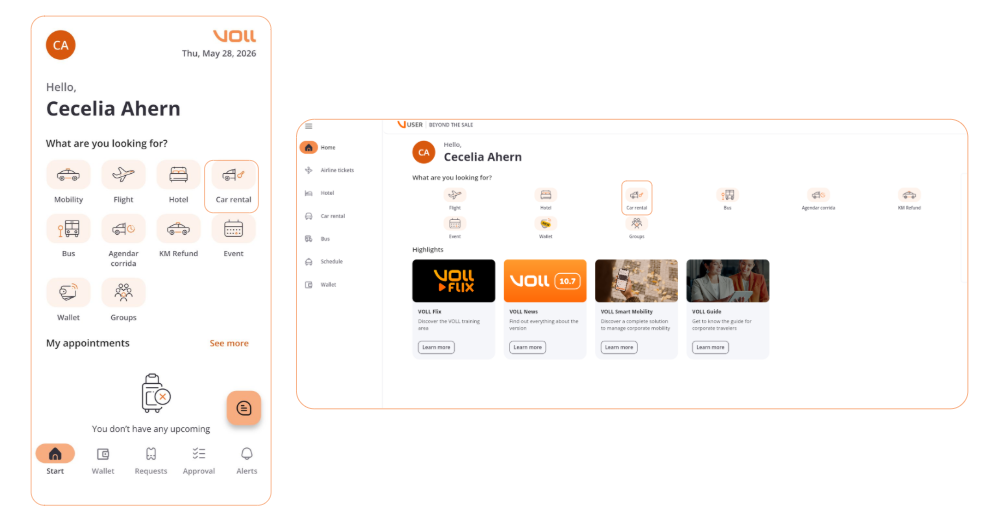
Fill in the requested information:
-
Pickup location
-
Drop-off location
-
Pickup date and time
-
Drop-off date and time
-
Driver
Then, click “Search.”
Scroll to the bottom of the results screen and choose one of the options labeled “Car with driver.”
Confirm your booking by filling in the traveler’s details: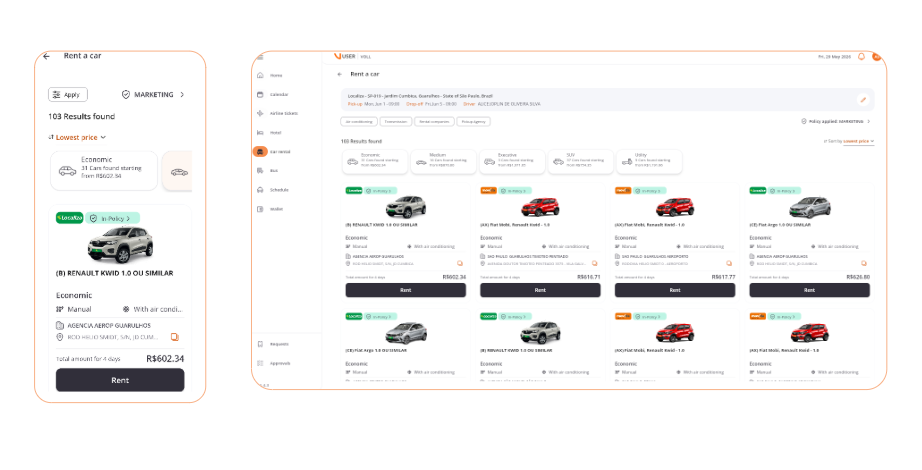
Company
Cost center
Reason for the trip
Internal notes (optional)
Click “Confirm booking,” and you’re done!
A voucher preview will appear on the screen with a summary of your reservation. -
Urban Mobility
-
Book taxi rides or request drivers from ride-hailing apps directly through the VOLL app. Simplify your urban travel with options that let you choose the ideal service, see pricing clearly, and monitor expenses—all within the platform.
-
To book a ride, there are two options: via the app or the web.
Via app: On the home screen, tap “Book a ride.”
Fill in the requested information:
-
Origin
-
Destination
-
Departure date
-
Departure time
-
Taxi cooperative
-
Main traveler’s name
-
Contact phone number
-
Companions (optional)
-
Preferences (optional)

Then, click “Continue.”
If you want to add a stop, you can do so by clicking the “+” icon next to “Destination” and filling in the “1st stop” field.
Confirm your booking by filling in the traveler’s details:
-
Company
-
Cost center
-
Reason for the trip
-
Internal notes (optional)

If you added a stop, the ride details will appear as follows:

Important: The additional cost for this stop will be calculated only after the ride is completed.
Review the ride details, click “Confirm,” and you’re done!
A preview of your voucher will be displayed on the screen with a summary of your booking. -
-
To use Smart Mobility and release balance on your VOLL card, open the app, go to the home screen, and tap “Mobility.”
After reading the introduction message, click “Release card.”
Enter the origin and destination addresses.
.svg)
Check the origin and destination addresses and select the desired transportation category.
On this screen, you will only see the mobility categories configured by your company for your profile.
Confirm the management details (company, cost center, reason, notes, etc.).
-
The visible cost centers represent those enabled for your profile by company.
-
In the notes field, provide more details about why you are using corporate transportation. This information will be shared with your manager and saved in your voucher, including in reports.
At the bottom of the screen, select “Release card” and then “View card details.”
.svg)
Select the option to view the card details by tapping the eye icon in the top-right corner of the card.
Copy your VOLL credit card information. After generation, the balance on the card will be available for 3 hours only for mobility or urban transportation apps.
With the card details copied, open your profile in the desired mobility app and add your VOLL card to your payment methods. It must be added as a credit card.
To see the step-by-step guide for adding the card in the Uber and 99 apps, click here.
To learn how to add the card in the Táxi Brasil app, click here.
To see other cooperatives where our card is accepted, click here.
Important: You only need to register your VOLL card once in the mobility app you will use.
For new ride requests, the balance will be released as soon as you perform the release again through the VOLL app, following these steps from the beginning.
If you have already added your VOLL card to the app previously, simply select it to request your ride..svg)
Complete your ride as usual, and if you need to request a new one, open the VOLL app and repeat the process from the beginning to release a new balance.
-
Mileage reimbursement (KM)
-
Track and request reimbursement for kilometers traveled easily.
VOLL allows you to record the trips you’ve made, simplifying the reimbursement process and optimizing the management of travel expenses. -
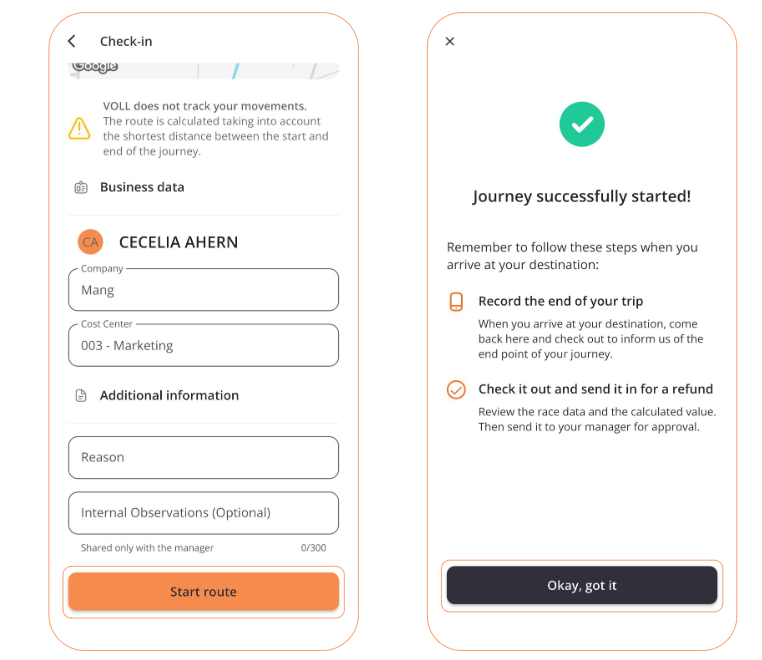
Starting the trip
The Mileage (KM) Reimbursement option is exclusive to the VOLL app.
To use this feature, simply click “Mileage Reimbursement” on the app’s home screen.
An introduction screen will open—click “Start.”
Check the starting point address or change it if necessary. By default, the GPS will show your current location.
Then, fill in the requested information:
-
Company
-
Cost center
-
Reason
-
Internal notes (optional)
Click “Start trip.”
Done! Now just begin your trip with your vehicle, and the app will automatically track it using GPS. Click “Ok, Got it” to return to the home screen.
Finishing the trip
Have you reached your destination? It’s time to end your trip, and the process is very simple.
Open the VOLL app home screen again and tap “Mileage Reimbursement.”
A screen with your trip summary will appear.
Confirm the endpoint (you can change it if necessary) and the distance traveled in “Total KM.”
Finally, click “End trip.”
All set! Your company will receive your trip details to process your reimbursement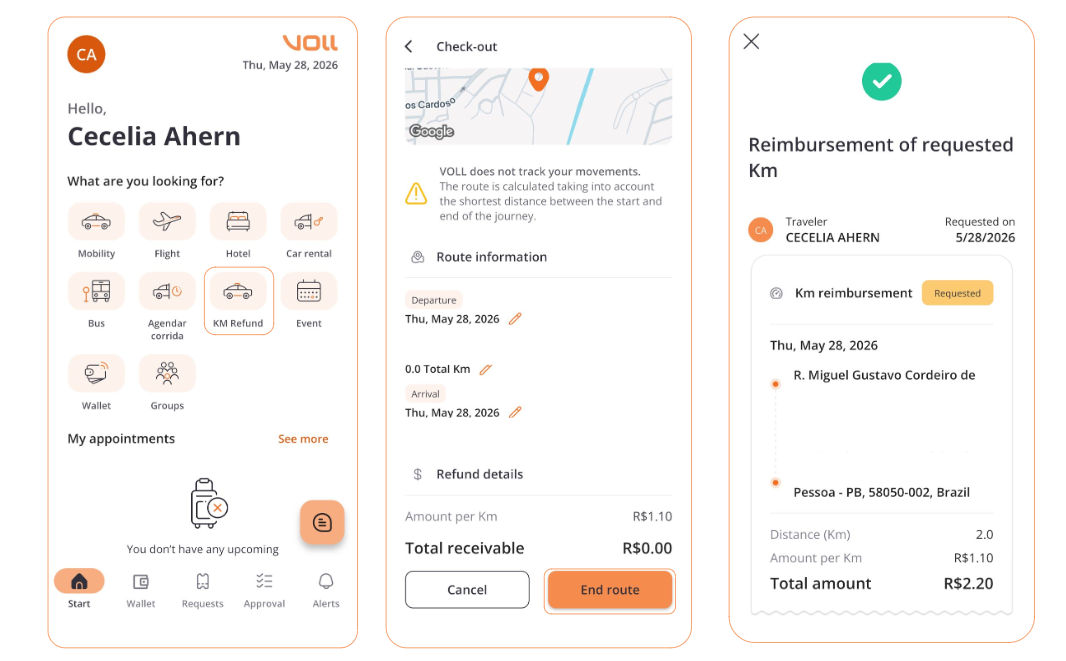
-
-
In the VOLL app, you can change both the date and the kilometers traveled.
To make changes, follow these steps in the “Mileage Reimbursement” option:
After starting a trip and selecting the starting point, tap “Mileage Reimbursement” on the VOLL app home screen again.
A screen with the summary of your ongoing trip will appear. Any option that can be edited will have a pencil icon. To modify any information, tap the pencil icon and update the details.
When you tap the pencil icon next to the start and end dates of the trip, a calendar will open. Select your travel period and click “Ok.”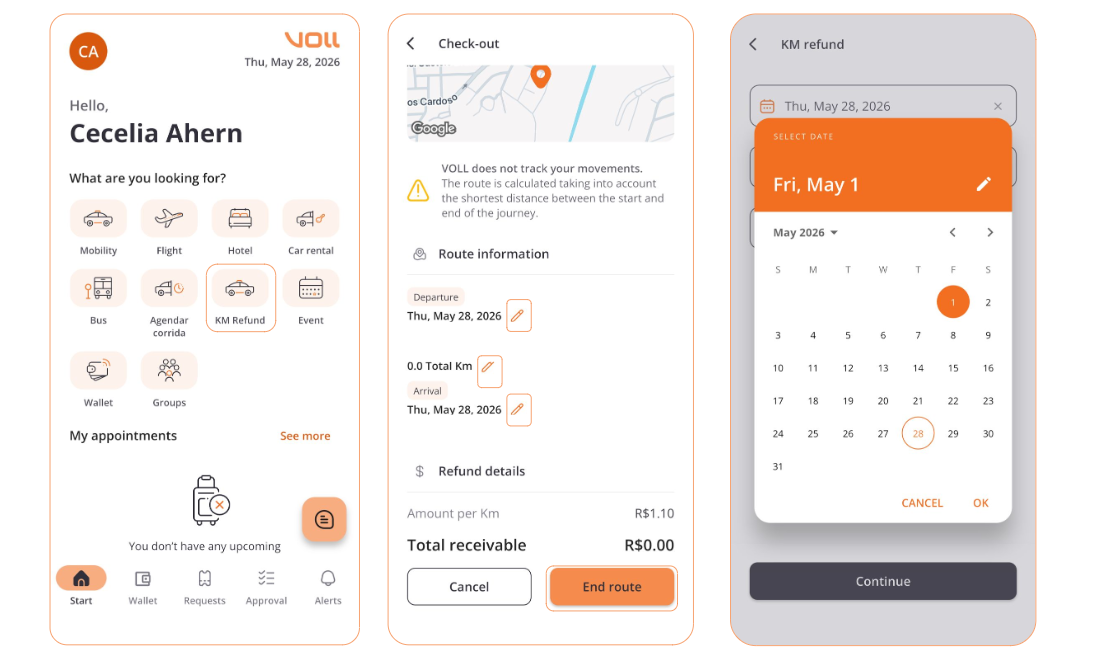
When you tap the pencil icon next to “Total KM,” a window will open for you to enter the correct mileage.
After filling in the field, click “Confirm.”
Finally, click “End trip.”
Then click “Keep adjustment,” and you’re done!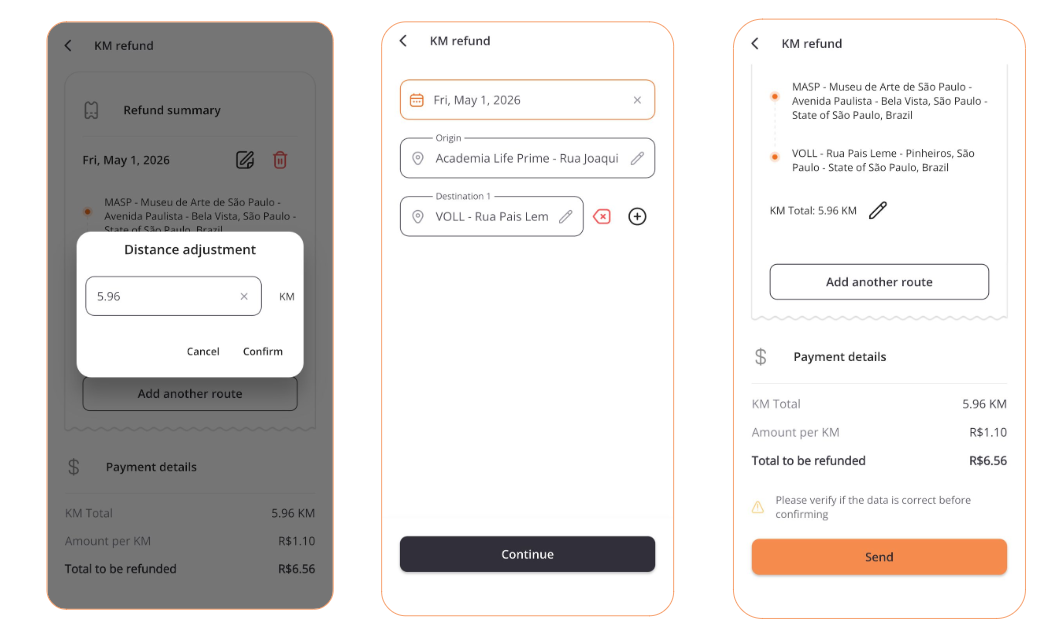
VOLL Wallet
-
VOLL Wallet is an extension of your company’s administrative and financial strategy, providing flexibility for employees and strict control for management. This balance transforms the way corporate expenses are managed, making processes more efficient.
At VOLL, you get the best of technology combined with all the consulting services of a TMC, through an exclusive mobile-first platform for expense management. -
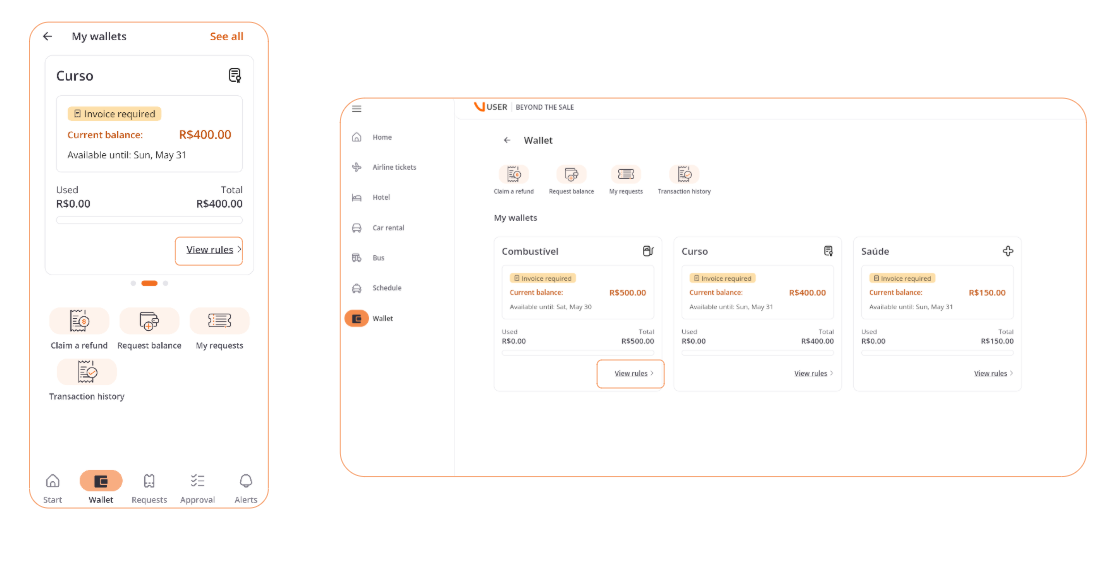
If you only have access to VOLL Wallet, when you log in, your home screen will be the Wallet itself.
Menus such as Requests, Approvals (for managers), and Alerts remain in the bottom bar when you are on the Wallet home page.
On the first page, you can view all the wallets enabled for your user and check whether they have pre-approved balances or if you will need to request a balance.
If you use other VOLL products, your home screen will include the Wallet option, both in the icons and in the bottom bar.
Available functions
When accessing the Wallet, you will see:- The wallets with pre-approved balance and those without available balance,
- The option to request balance,
- The option to request reimbursement (if any wallet is enabled for this function),
- The option to make payments via Pix/transfer (if any wallet is enabled),
- A statement of your expenses.
Important: The Wallet can be accessed both via the app and the web, but only through the app you can view the payment options via Pix and credit card.
-
The Wallet allows you to enable biometric validation, which, if activated, will be required every time you make a payment. Validation can be done through fingerprint or Face ID only.
For devices that do not support this feature, you won’t be able to enable it, but you will still be able to make payments normally. -
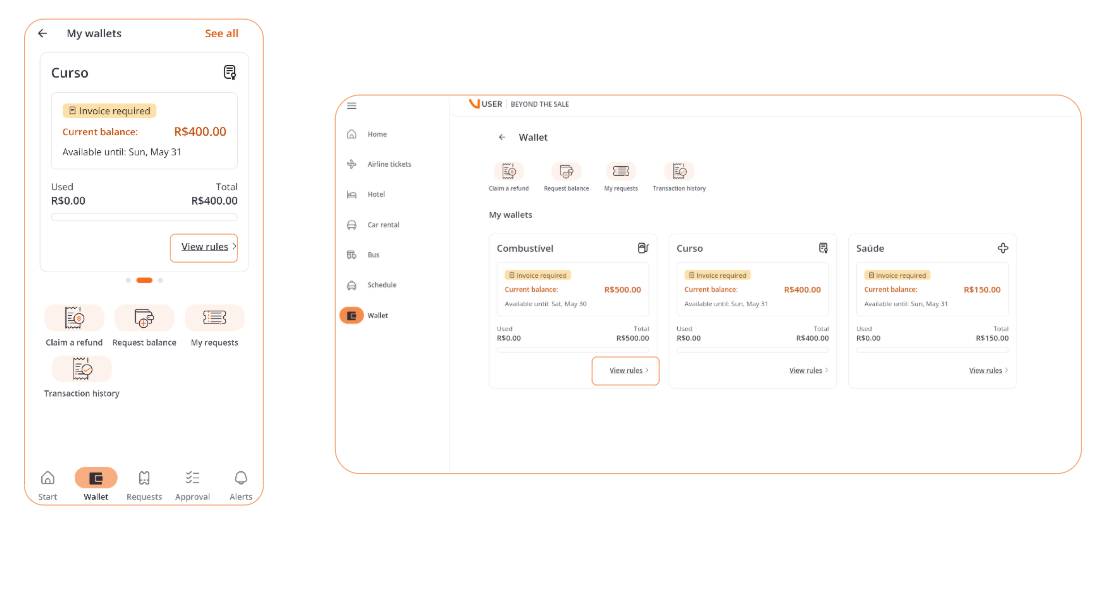
You can check the categories and payment methods configured for each available wallet by clicking on “View wallet rules.”
-
With the statement, you can track the amounts being credited daily as well as the payments being made, identifying each wallet by its corresponding icon.

-
Confira este passo no VOLLFlix
To obtain balance in wallets where it is only available with your manager’s approval, simply click on the “Request balance” option on the home page.
The traveler must provide:
The travel proposal
The period (start and end dates)
The wallet that requires the balance to be released (if not already selected)
The reason for the request
The travel period
Company
Cost center
IMPORTANT: The Company, Cost Center, and Reason fields will be mandatory for all payments made with the balance from this wallet.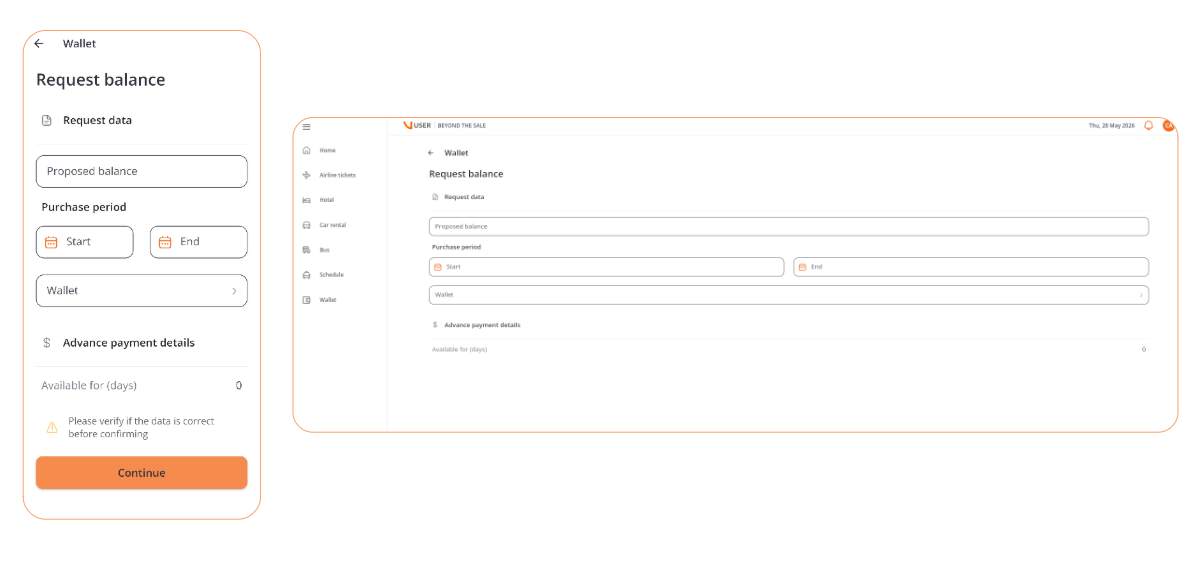
It won’t be possible to specify a desired amount, as all values are already set in the policy.
After filling in all the required information, just click “Confirm.”
Done! Your request has been sent for your manager’s approval.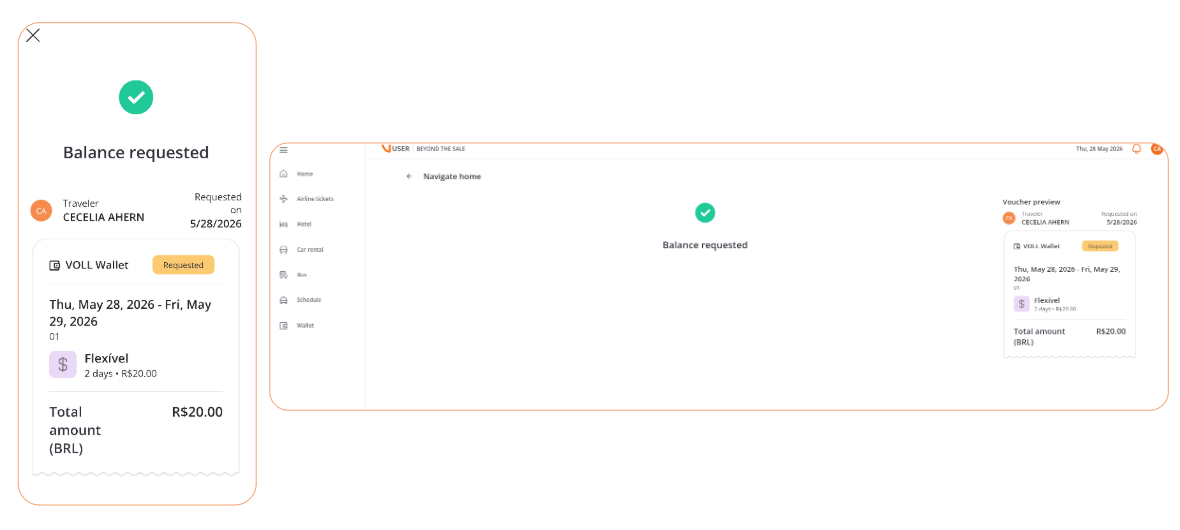
These requests follow the same approval flow as other services when within policy, sending the request to the respective approvers or cost center.
If there are no approvers or cost center configured, the request will not be completed, and a message will be displayed stating that no approval flow is set up and that you will need to contact your manager. -
The VOLL Wallet digital credit card uses contactless technology through digital wallets like GPay and Apple Pay.
This means you can make tap-to-pay transactions at any establishment that accepts Mastercard and has NFC (Near Field Communication) enabled terminals.
NFC technology allows data to be exchanged between nearby devices quickly and securely, without the need to insert the physical card into the terminal.
Activating your card
In VOLL Wallet, click on “My Card.” After the security authentication, click on “Set up digital card.”
To configure your card, fill in the following fields:
- Company
- Cost center
- Project/branch, if applicable
- Make sure to fill in this information carefully, as it will be used for your future payments if the wallet is pre-approved.

Create a 4-digit PIN for your card.
View all the details of your VOLL digital card.
For wallets that require approval, the company and cost center information provided in the balance request will be used. This information can be updated anytime on the card screen.
For Apple devices, click “Add to Apple Wallet.” For Android devices, click “Add to Google Pay” and then click “Continue.”
You can see how to complete this setup in your mobile wallet by clicking here.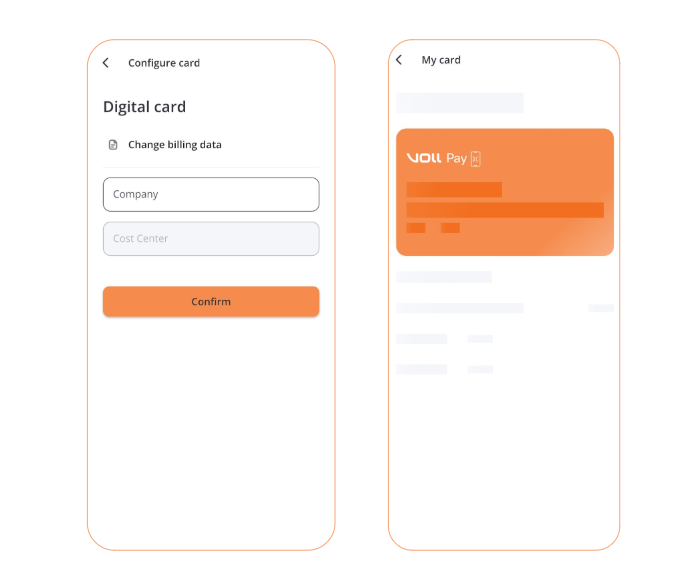
Important: In all wallets, the “credit card” payment method must be enabled for you to pay for your expenses, considering your available balance.
Charges
Approved payment
Once you add your VOLL digital credit card to your smartphone or smartwatch wallet, you can make payments by tapping your device on NFC-enabled credit card terminals.
The amount will be automatically debited from your wallet, following these requirements:
A wallet enabled for credit card payments with the MCC (Merchant Category Code) of the establishment
Sufficient balance available in the wallet
Note: If more than one wallet is available for the same MCC, the payment will use the wallets in order of priority defined by the administrator. If the first wallet doesn’t have enough balance, the amount will be debited from the next wallet, and so on.
If no wallet has the required balance, the payment will be declined.
Declined payment
Payments may be declined for three reasons:
The user policy requires expense reporting, and the last payment has a pending invoice.
Insufficient balance in any wallet for the MCC
No wallet has the MCC of the establishment
For any declined payment, push notifications and notifications in the central hub will be sent.
Voucher
The voucher is automatically generated after payment confirmation. Key points to note:
Wallets requiring approval: Enter the company, cost center, and reason when creating the voucher.
Pre-approved wallets: Enter the company and cost center registered in the VOLL app. By default, the reason for both wallets will be: “Payment made with card.”
Receipts
Mandatory receipt
New payments will be blocked on the card until any missing receipts are attached. To attach a receipt, access VOLL Wallet, click on the pending item, and upload a photo of the receipt.
Non-mandatory receipt
There is no payment block for missing receipts. -
Management Data
To make a payment via Pix, on the Wallet home page, click “Pay with Pix,” then fill in the information for expense reconciliation:
-
Wallet: The system automatically selects the wallet currently displayed in the Wallet, but you can change it among wallets configured for Pix payments.
-
Category: The system lists pre-registered expense categories linked to the selected wallet.
-
Company: For pre-approved wallets, if you have a default company, it will be filled automatically; for wallets requiring balance approval, the system will use the company from the approval request and will not allow changes.
-
Cost Center (CC): For pre-approved wallets, if the traveler has a default CC, it will be filled automatically; for wallets requiring balance approval, the system will use the CC from the request and will not allow changes.
-
Reason: For pre-approved wallets, the system lists pre-registered reasons; for wallets requiring balance approval, the system will use the reason from the request and will not allow changes.
-
Internal Notes: Optional open field for additional information.
Important: If you don’t have available or sufficient balance, the system will not allow the payment.
QR Code ScanningWhen proceeding, the system opens the camera to scan the QR code. Note that the QR code may or may not include a value, which determines the behavior of the value information screen. You can also choose to enter a Pix key manually.
Attention: The VOLL app must have camera access enabled; otherwise, it will request access.

Pix Key Information
If you don’t have a QR code to scan, click the option “Enter Pix Key manually” and input the recipient’s Pix key manually. Possible key types include:
-
CPF or CNPJ
-
Phone number
-
Email
-
Random key
If the entered key is invalid, the system will display “Invalid key.” If everything is correct, you will then enter the amount to transfer.
Entering the Amount
At this stage, if the Pix key was entered manually or the QR code does not have a fixed value, you must enter the amount in reais and cents. Payment can only be completed if the minimum amount of R$0.01 (one cent) is entered. You can also check the recipient’s name, document, and bank.
The amount will always be transferred according to the current date and Bacen regulations. Transfers between 8 PM and 6 AM are limited to a maximum of R$1,000.
Important: If you try to make a payment to the same Pix key with the same amount within a 5-minute window, the payment will be blocked. The timer only starts after the invoice submission is completed.

Invoice Submission
Once the operation is confirmed, the system completes the transfer automatically without the need for manager approval, recording who made the payment, when, to whom, the company, cost center, and expense category, and finally displaying a voucher preview.
Attention: If the operation encounters an error and the transaction is not completed, you can try again by returning to the loading screen or canceling the operation and returning to the home screen.
In the voucher preview, if your company policy requires attaching an invoice, verify your purchase by uploading a photo. There is no need to keep receipts for later expense reporting.
If you don’t complete this step after payment, the system will block you from making new payments until the invoice for the last transaction is provided. Note that this block applies to all wallets.
In the Wallet, a pending notice will be displayed. You can attach the invoice by clicking on the notice. Once the photo is submitted, the system will allow you to make new payments.
-
-
You can request a reimbursement both via the app and on the web by clicking “Request reimbursement.”
The system will automatically select the wallet in focus. If reimbursement is not allowed, a warning will appear, and you will have the option to request it through another wallet.

After clicking, you must provide the following information:
-
Recipient of the reimbursement
-
Company
-
Cost center
-
Reason
-
Notes (optional)
Then click “Add expense.”

On the next screen, you must provide the following information:
-
Wallet
-
Expense category
-
Date
-
Currency
-
Amount
-
Notes (optional)
Additionally, you will need to attach the receipt.

After clicking “Attach receipt,” review and confirm your information, and check the reimbursement summary.
Then, simply click “Submit.”
Once the request is completed, the balance will be debited from the wallet, and the voucher will be sent for manager approval.
If your manager rejects the request, the balance will be credited back to the wallet. If approved, no additional debit will occur since the balance was already held.
Attention: If the expense date is retroactive, it’s important that you had sufficient balance on that date; otherwise, you won’t be able to submit the reimbursement request. -